DIY: 5 handmade gift ideas

DIY Handmade gifts

When I hear the words Handmade and Personalised, I think of the time, effort, thought and skill that a person has put in to make a gift that’s unique and personal. A while ago, through my Make It Personal series, I had blogged about creating fun, personalised and unique gifts.

Handmade gifts

Though I’ve concluded the series on my blog, it’s been nice to see some interesting handmade gift ideas on other blogs. So, here’s a roundup of some exciting posts on handmade gifts.

DIY 1: Custom Instagram iPad cover

A handmade iPad cover

Asley Hackshaw of Lil Blue Boo  makes this fun Instagram iPad cover. Choose pictures of your favourite fun and happy moments and make a custom iPad cover. It doesn’t even have to be pictures, it could be anything you like. View the tutorial here.

DIY 2: Light of my life

handmade valentine light bulbb

Kate of Kate Pruitt does an amazing job with this valentine light bulb. It’s aptly called ‘light of my life’. This one is my favourite. Check it out here.

DIY 3: Handmade hip diaper bag

handmade diaper bag for mums

Elizabeth Klett of A Mingled Yarn shows how to make a hip diaper bag for new mothers. I prefer this to the standard and staid ones available at most stores. Get more details here.

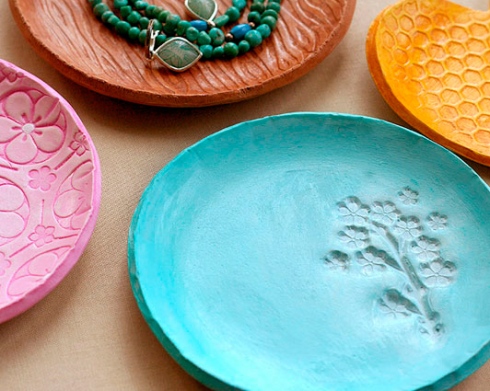
DIY 4: Clay jewellery dish

handmade clay dish

Lisa Storms at Fiskars has fun with colourful clay dishes that can store jewellery, keys and other odds and ends. Get the details here.

DIY 5: Vintage dog feeder

handmade dog feeder

Julia Custer Norris of Handmade Green created this cute vintage elevated dog feeder. This one is a perfect gift for people with dogs or cats as pets. You can catch the tutorial  at Design Sponge here.

Make It Personal: gift a book journal; a heirloom in the making

make it personal: gift a handmade book journal

Today on the Make It Personal series, I have a guest post on book journals by Natalie Uhing of The Smallest Forest. Nat calls herself a person  compelled to articulate living and loving with her hands; someone who loves the singular quality of  the handmade, creative, and self-reliant life. Just the right person for the Make It Personal series! While she works with embroidery, textiles, paint and jewellery, Nat is a bookbinding specialist and in today’s post she is going to show us how to transform a generic sketchbook into a beautiful book journal gift. 

Make It Personal: cheap and nasty sketchbook makeover

by Natalie Uhing

The Cheap & Nasty Sketchbook Makeover

Materials you will need:

  • a cheap and nasty generic hardbound sketchbook
  • acrylic binder or matte medium
  • art materials and tools finishing varnish
    • acrylic paints
    • bit of fabric (optional)
    • various paint brushes (including a fine sable liner)
    • scrap of bubble wrap
    • a small piece of tracing or drafting film
    • a scalpel or blade tool for cutting stencils
  • PVA glue
  • scrap sheets of plastic
  • two pieces of cardstock (colored or printed…scrapbooking sheets are good)

I start by taking the sketchbook apart.

  1. Peel the endpaper away from the book, starting on the loose side and pulling gently toward the cover. Repeat for the endpaper at the back of the book.
  2. This will expose a strip of “mull” that connects the text block (the machine-stitched block of white pages) to the inside of the covers. Gently unpick this mull with your fingers (traditionally the mull is fabric, in this cheap and nasty version it is a pulpy strip of paper that is super easy to pull off).
  3. Clean off the remaining bits of white paper stuck to both the covers and to the back of the text block.
  4. Brush acrylic binder (or matte) medium on the covers and let dry.

Taking the book apart

While the cover is drying, I strengthen the text block a little bit:

  1. Cut a strip of cotton that is slightly less than the height of the text block (my block was 6″ high, so I cut a strip 5 1/2″ high) and make the width of the strip 2 inches + the width of the spine (the thickness of the block).
  2. Spread some glue onto the spine of the text block with a finger.
  3. Lay the cotton strip onto the spine, centering it between the ends of the spine and also from side to side. Spread a bit more PVA glue on top of the fabric and work it in with a finger.
  4. When the glue on the spine part has dried, glue the sides of the cotton mull down to the first and last pages of the text block. Stick some plastic sheets under these two pages, to prevent the moisture of the PVA glue from soaking and warping the rest of the pages. Let it dry.

Replacing the old mull with fabric

Meanwhile, your cover should be dry and ready to paint:

Give the covers a coat or two of opaque paint (I used white acrylic wall paint, and a paint roller for even coverage) and when that is dry, put on the background color/s using a brush and artist’s acrylics.

paint covers with 2-3 coats of background paint

WTID (when that is dry), roll/brush a contrasting color of paint onto some bubble wrap, and ‘print’ with it. If you use thick paint and leave the bubble wrap to dry a little before pulling it off, you’ll get brighter colors and a sharper print.

press covers to bubble wrap to get print

WTID, mix some acrylic gloss or matte medium with a bit of color to make a translucent glaze. I made two colors of glaze here…Indian Yellow and Alizarin Crimson.
mix some colors with acrylic medium for glaze

Brush the glaze randomly over the covers. Before the glaze dries, blot some parts with crumpled balls of newsprint to bring back some of the background color.
before glaze dries, blot some off with crumpled newsprint for texture

At this point I cut out a heart shape from some fabric, and stuck it down by saturating it with acrylic binder medium. Totally optional, I could have painted a heart just as easily.
lay fabric shape down and saturate with binder medium

With yet another glaze of some ‘stand-out’ color, paint your text (or whatever) using a small brush. I used metallic sapphire blue, cut back with a few drops of water.
paint text on using a translucent glaze

WTID, outline the letters using a fine sable paintbrush and some very opaque white paint or acrylic ink.
outline text with opaque white acrylic ink

To the leftover opaque white paint I added a drop or two of pink, and again used the fine sable brush to make random patterns and marks here and there with the pink paint.
mix up an opaque color and make fine patterns for interest

Then I added a little water to the pink paint and, with a loaded brush, ran drips down the front book cover by standing the book covers up. You can control how far down the drips run by laying the covers down flat and letting the drips dry before doing the next run.

used the same opaque pink to run drips down the front cover

WTID paint in some spots around the text with a fine brush and a complementary color, to break up the background some more. I used metallic ‘sunset gold’.
painted around some letters with metallic sunset gold

At this point I decided the covers needed some lifting with opaque white motifs here and there. And what better motif for a book called The Story of A Young Heart, than A Flock of Seagulls? LOL.

So I drew a seagull from a bird book onto some tracing film, and cut the shape out with a scalpel. I then brushed opaque white paint over this stencil…flipping the stencil over to do a few gulls facing the other way.

cut a simple stencil from heavy tracing paper or drafting film

When the covers had dried, I put a coat of solvent finishing varnish over everything, to protect the paint and to bring out the brilliance of the colors.

Now to put the sketchbook back together (clockwise from the top left picture)!

1. Take a pair of scissors and cut the first and last pages of the text block (the ones with the mull glued on) so that they are just an inch wide. Place a sheet of plastic under each of these strips of mull, to protect the pages underneath, and spread PVA glue over the strips.

N.B. Don’t put glue on the spine of the book, just on the strip of mull facing up. Position the text block in the covers—centering it top and bottom and making sure there is about 1/8 of an inch of cover showing at the foredge—and close the cover so that it comes in contact with the glued-up mull. Carefully turn the book over and repeat for the other side. 

2. Press the book on a flat surface underneath a board and a couple of dumbbells or dictionaries or something, for at least an hour.

3. Cut a new pair of endpapers from the cardstock, making sure they are the same height as the white pages of the text block, and double the width of a white page.

4. Open your (should be dry!) book up and smear just a line of glue on the first page of the block, from top to bottom, right alongside the gutter where the cover folds.

5. Lay the folded edge of the endpaper on top of this first white page, let it dry so that it doesn’t slide around.

6. WTID, place a plastic sheet underneath the top half of the endpaper (to protect the pages underneath) and spread glue evenly over the entire surface. Remove the plastic sheet just before you gently close the cover. Press down, and resist the urge to open up and have a look…the damp endpaper will stretch when you open the book, and when you close it again the paper will wrinkle up. Flip the book over and repeat for the other side Let dry two hours. You’re done!

collage 4

From a cheap sketchbook to a book journal with a sense of humour

Some notes on inspiration and on gift-giving:

Have fun and be playful. I attempted to paint the covers of this sketchbook at least three times before…trying too hard to make everything perfect and wonderful. There were rabbits. Flowers. There were long-legged girls in fashion poses. The sort of stuff you see everywhere on Pinterest these days. But they all felt ‘forced’ and I felt terrible looking at them.

Finally, I put on a playlist of 80s music, decided I didn’t care what the outcome would be, and when A Flock of Seagulls came on, singing, “This is the story of a young…heart…” I saw a sketchbook cover with those words as a hand-lettered title, done in bubblegum-and-pop 80s colors, and a flock of white seagulls…and knew that, this time, it was honest and it would feel ‘right’. It’s not elegant or delicate, but perhaps those things don’t belong on a “cheap and nasty” sketchbook, anyway. What it has got is a sense of humor, and I’m happy with that.

Who would you give a blank book to? (remember, it needn’t be a sketch book…you could do the same thing to one of those hardbound ruled notebooks) Anyone who keeps a journal or diary; artists who sketch (especially if they like to sketch on the go) or draw; you may know someone who collects poems, quotations, or recipes, and could make them a book for that purpose.

The great thing about giving blank books as presents is that the final, real value of the book is something that shows over time. Even the nicest, poshest journals and sketchbooks are only empty vessels, brimming with potential, yet unfinished, incomplete. It is the accumulation of art and writing, of precious snippets and personal stories, the acts of mark-making by the owner, that give the blank book its meaning and reason for being.

And unlike many other gifts that get thrown out after some time — because they look battered, have been heavily used, and have been used up — a book only become more precious with use and time. Almost nobody throws out a dog-eared, yellowing and cracked old journal — its pages covered in writing — that belonged to a great-great grandmother!

When most things become ‘junk’, hand-penned books become heirlooms.

Charm your way through Christmas gifting

Pandora's christmas collection

This post is brought to you by Pandora, the maker of hand-finished and modern jewellery.

Christmas gifting with Christmassy charm bracelets

Have you started thinking about Christmas gifts yet? Do you have visions of Christmas gifts gaily gift wrapped and stacked neatly under a tree? While Christmas gift shopping is a lot of fun, it can also be taxing if you have a lot of gifts to buy but not nearly enough ideas on what to buy. And there is always the danger that you may end up buying something the recipient already has!

You can eliminate that risk to a certain extent when you choose to gift jewellery. The good thing about gifting jewellery is that it can appeal to an age group ranging from five to seventy five. The trick, of course, is to choose the right kind.

Pandora’s Christmas collection of charms

Wouldn’t it be fun if you could include all the elements of Christmas in a piece of jewellery? That would make for a truly Christmassy Christmas gift! Pandora’s new Christmas collection of charms can help you do just that. This collection has fun and adorable charms in sterling silver and fourteen-carat gold.

stocking, christmas tree, santa in a sleigh and other cute charms from Pandora

Know someone who is down, feeling the blues and could do with some Christmas cheer?  Help such a person celebrate the festive period with a charm bracelet that has a little Christmas tree and a gift charm. It is the season to be jolly after all. Maybe you know a little girl who would fancy one with a Santa, a sleigh and a Christmas stocking filled with gifts? Or perhaps you have a girl friend who would enjoy the company of a gnome, and an angel? Of course, with winter on its way, nothing could be more appropriate than a snowman.

Whatever your preference, there is a lot to choose from. Not to mention the fun you will have putting together different charm bracelets that can be personalised and customised depending on the recipient. The best part about Pandora bracelets is that no two bracelets are alike. You can mix and match by choosing from any of the individual charms and bracelet bands to create one that is unique.

While Pandora has stores all over the world, to make your shopping experience easier, Pandora has introduced an online store called the Pandora eSTORE*. Designing your charm bracelets is a click away. All jewellery ordered through the eSTORE will be delivered in a complimentary Pandora gift bag, finished with a signature pink organza ribbon.

*The eSTORE currently ships only to the UK.

Mummy’s jar

A little bit of pampering, a little bit of love

jar of goodies

Hands off everyone, this one is just for mummy!

I recently visited my friend Yana who gave birth to a baby boy two weeks ago. While I had gifted her a painted baby name sign (read all about that here) at her baby shower, I was keen to give something that was just for her.

From my own experience, I knew being a first time mother could be stressful and tiring, especially in the first month. During this period, everything tends to revolve around the baby and a good night’s sleep is a luxury!

So, I put together a mason jar of little things — chocolate candy, raisins, chewing gum, fruit flavoured chaptsick and tissues with a cute cow print on them. She can place it within arm’s reach and help herself to whatever she feels like or needs at any time of the day or night.

Description

Fruit flavoured chapstick and a fun cow print tissue

I decorated the jar with a label and ribbons and added a tag that read:

Candy for the sweet moments with the baby.

Gum for those days when you don’t get time to even brush your teeth!

A tube of chapstick to soothe lips overworked from showering the baby with so many kisses:-)

And tissues to wipe your hands clean.

My friend loved it and thought it was very thougtful! The good part about this kind of gift is that it is versatile and not many can resist a goodie jar! You can fill it with any number of goodies …jams, pickles, cookies, anything that the recepient likes.

Plain ol’ $$$

an innovative way to gift cash

Where’s the dough?

When there are two blogs writing on the same topic, one might think the content would be the same. Turns out, not. So I wanted to make the most of this situation by getting  Anne of Unique Gifter to do a guest post on a topic I wanted to attempt but never did — gifting cash. She also shares some fun and creative ideas on how to make a cash gift interesting!
—X—

Hello, my name is Anne and I write over at Unique Gifter where I try to inspire creative, personalised and unique gifts and ways to save on gifts.  I was so happy to discover a kindred spirit in Sarita!  She graciously guest posted for me recently, so now I am returning the favour. 

Plain ol’ cash as a gift

But wait – cash is so impersonal, cash is so specific, cash doesn’t have any thought put into it, etc.  Has anyone ever been disappointed with cash and not had a way to spend it?  Not usually, most of us are glad to end up with a bit extra.  It just spends so well, on anything!  When given cash, many people choose to save it up in order to purchase a larger item, such as a TV, new piece of furniture, vacation or that ridiculously expensive pair of designer jeans they’ve been wanting.  Especially at weddings, cash is considered the best gift idea!  In some cultures, it is the only gift given at weddings.

I have read of people who hate to give cash as a gift, because they think it is such a “cop-out” or lazy gift; however, they still like to receive cash as a gift.  Rest assured, you can make cash a very creative gift and still end up with smiles all around.  For a much larger list of fun ways to give money, please visit my Cash Gifts page.

One of the easiest, and one of my favourites, is to simply buy a can of Play-Doh and put the money inside!  This works best for adults, who usually have a feeling of nostalgia regarding Play-Doh.  A 12-year-old doesn’t usually feel the same way.  As an aside, if someone is highly allergic to gluten, do not choose this idea, as Play-Doh is full of it.

Another simple, sneaky way to give cash is to go out and purchase a chocolate bar with a wrapper that slides and/or folds on.  First, compare the size of the chocolate bar to the size of the bills.  In some countries, such as those in the Euro Zone, the size of bills varies.  Make sure that your bills are smaller than the chocolate bar.  Next, wrap the money in plastic cling wrap from your kitchen, making sure to get it as flat and smooth as possible.  Then carefully unwrap the chocolate bar, lay the money inside and re-wrap the bar.  It is easiest to do with chocolate bars that have foil covered by a slide-on sleeve.  In your card, make sure to say “open the chocolate bar to check for your golden ticket!” or something similar, as you don’t want them to not receive the money!

Innovative way to gift cash

Don’t get let the wrapper fool you

When it comes to kid’s birthdays, apartment dwellers or students going off to college, it can be very handy to have lots of coins.  For kids, it may be a way to give them a trip to an arcade!  For others, it could be a good way to pay for the coin-op laundry throughout the year, or a way to pay for coffee or parking easily.  Go to the bank and ask for a roll or two of coins in whichever denomination you choose.  Warning: some coins can add up quickly in value!!  Here are a few ways to wrap coins as a gift that’s fun and unique!

There are several great ideas in this forum thread, one of which is making a pickle jar!

Pickle Jar

1)     Get a pickle jar.  Either decorate it with paints or leave on the label.

2)     Paint the rolled coins to look like little pickles, warts and all.

3)     Stuff your “pickles” back in the pickle jar.

4)     Fill the excess space with green tissue paper “brine.”

Paper Car

1)     Create a folded paper car, using this eHow tutorial.

2)     Use two coin rolls to make the axles – glue the front two wheels to either end of a roll, then glue the back two wheels to the other coin roll.

3)     Decorate your car!  Include the message, “This is how I roll!”

Candy!

an innovative way to gift cash

Coin candy

1)     Find or print wrapper paper in a striped pattern, like red and white or red and green.  Alternatively, use plain paper and then wrap strips of ribbon around them.

2)     Wrap the coins up in cellophane, and twist the ends!  Use a bit of ribbon or tape to keep closed, if they need it.  I originally found this idea on the Martha Stewart site.

Important tips for giving cash as a gift:

  • eMail money transfer: By far the most secure way that we received money was via eMail money transfer.  Pretty much every financial institution in Canada (I do not know about Europe) provides this option and most accounts will be allowed a few for free per month.  You set up a question and answer for the recipient to verify the transfer.  In your card, indicate the $$s you will be sending and give them the question and answer.  This is a good spot to add some flare and personality in for the couple, by making the question personal and funny.  At an appropriate time, send the eTransfer from your online banking to the recipients email.  This may be once they have returned from a honeymoon, before the wedding, the next morning, or whenever makes the most sense.  Most transfers are valid for 30 days or so, before expiring.  The recipient simply clicks on a link in the email, logs into their online banking and deposits the money.  It massively reduces any chance of cash or a cheque going missing.  Cheque canceling fees can be pricey!  [Yes, I’m Canadian, we use cheque not check.]
  • The thing that makes cash such a great gift also makes it very attractive to thieves.  It is very portable and hard to trace.  If you are ever worried about leaving a cash gift somewhere, trust your instincts and make sure to hand it to someone trusted!
  • If you really want the recipient to use it for something specific, you should say so in the card.  Otherwise, do not be offended when they use the money to pay down debt, pay for wedding costs, spend it on their honeymoon or just to buy groceries.

Bringing stories to life

I was recently over at Anne’s blog, Unique Gifter. It was fun and exciting to be a guest on another blog! I’m glad to have found a kindred spirit in Anne, who like me, writes about gifting.

When Anne requested me to do a guest post, I was, at that time, working on a gift idea for children. So I decided to base my guest post on the same topic.

What’s childhood without stories galore and this gift is all about bring stories to life. Read all about it here. 

Yumm…gifts of the edible kind

On my birthday last week, I was surprised with some birthday gifts of the edible kind.  They looked great, tasted delicious and were over in a jiffy!

edible gifts

This one is from my friend Yana: Chocolate balls on sticks that say ‘Happy Birthday’.

edible gifts


This one is from Irene: A yummy cup cake complete with a tag wishing ‘Happy Birthday’ in Danish:-)

That got me thinking about some other kind of edible treats would make great gifts. Apart from the eternal favourite chocolate and the increasingly popular wine, are two things that would also make great gifts…tea and coffee.

Tea:  These two gorgeous gifts for tea lovers are from Tea Forte.

edible gifts

For the tea lover

edible gifts
For those who prefer cold tea.

Coffee: From beans to ground powder, there is a whole lot to choose for coffee lovers. Being an Indian and lover of kaapi (as we South Indians call it), I would buy some Malabar coffee, store it in a beautiful canister and voila I have a gift.

edible gift

A beautiful David Mason canister to store your coffee.

I have an audience

Illuminating blogger award

Being the author of a blog can generate mixed emotions. It is fulfilling to be able to write and share with the world your thoughts, ideas and feelings. You write for the love of it. Yet, deep down, you wonder, “is anyone out there in the WWW (other than your close circle of family and friends who you’ve coerced into following your blog of course) reading my blog?”

So, when I recently learned I was being nominated for the ‘Illuminating Blogger Award’ by Food Stories I was thrilled (thank you CJ). It meant two important things: there are people, who I don’t know personally, reading my blog and they liked what I wrote enough to nominate me for this award. What a pleasant revelation!

I’ve been asked to share one random thing about myself and nominate other interesting blogs I think are doing a wonderful job. So here goes:

Old temples and churches,

And red brick houses.


Hand written letters

And soft, ticklish feathers.


The smell of books

And cosy little nooks.


Hearing stories of faraway lands,

The feel of my daughter’s soft little hands…


…these are a few of my favourite things.

My top five blog picks are:

NieNie Dialogues : Stephanie, an airplane crash survivor, is an inspiration and writes about every day life. You can also read my post on her here.

Design Mom : Gabrielle writes on the intersection of motherhood between design.

Wrisources : Vijay writes (as he puts it for business and pleasure) on a range of topics. My favourite is his take on communications.

Pillows a-la-mode : A craft blog by a wonderful lady who is a teacher, mom and grand mom.

Homemade by Jill : A delicious looking blog on all things home-made.

You can read more about the Illuminating Blogger Awards here.

The simple, everyday people

Who are these people? They are the gifts that life, in all its wisdom, bestows on us.

A family that elicits in you a warm, fuzzy, safe harbour kind of feeling; friends who’ve seen you happy, sad, scared, grave and silly and love you all the same; teachers who indelibly shape our lives and mentors and coaches who chisel out better versions of ourselves with each passing day. They are the simple, everyday people who ironically don’t expect to be thanked.

I recently had the opportunity to write letters to just this kind of people.

I chose the letter to show my appreciation and heartfelt joy at having them in my life. The thing with letters is you can convey emotions and feelings you probably never could in a face to face conversation. It swallows distances in a jiffy and stays back as a memoir of your emotions, your feelings, your intentions.

My first set of letters, prompted by my move from India to Denmark, was to my sisters. On handmade paper, in the neatest handwriting possible (notice how it takes a while to get used to writing without any errors when your fingers are accustomed to typing and your brain is relying on spell checks) I wrote what they mean to me and what I love about them. In effect everything I always thought I would say to them but was too shy to do so in person. Somehow, my letters and the subsequent responses have brought us closer than ever before.

The second, more recent one, was an email to one of my teachers from school. It was her birthday and I was just glad she was born to be my teacher. I credit her to a great extent my love for reading and writing and my career as a communicator. Impulsively, I wrote to her thanking her for playing a part (to perfection) in who I am today.

The third one, also an email, was to a lost friend…that sadly remains unanswered.

But I live in hope and will continue to write letters to show my appreciation for the gifts in my life.

A baby shower

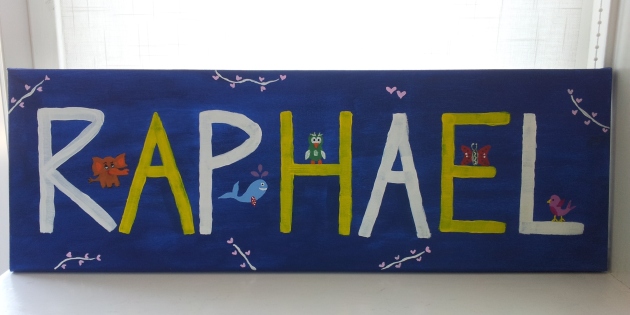
A custom made baby name sign

A name sign for baby Raphael

What's a gift with some pretty gift wrapping?

And it’s a wrap!

Today, I attended a baby shower for the first time ever! In India, some Hindu communities have a ‘woman only’ ceremony for the mother-to-be when she is in the 7th or 8th month of her pregnancy. It is called godhbharai in North India while in South India it is called Valaikappu or Pulikudi. The mother-to-be is decked in traditional attire and is showered with blessings by the women from her family and community. In India, it tends to be a religious ceremony while the western concept of a baby shower is oriented towards fun.

The one I attended was hosted for my Indonesian friend, Yana, by one of the girls from our Danish language class. Our host gave us a chance to experience a baby shower American style …but without the cheesy games! The entire room was decorated with ribbons, balloons and signs…all in blue. After some yummy homemade cake, a variety of finger foods and fun conversation we sat down to open the gifts.

Since I knew that my friend was having a boy and having pried out the baby’s name, I had made a cute and colourful name sign for the baby. I painted the letters in the name in white and yellow against a dark blue background. I then peppered it with some cute animals – an elephant, a whale, an owl, a butterfly and a bird. Some nifty work with gift wrapping paper, magazine strips and a gift tag followed to complete the job.

Little Hippo rompers!

The gifts from the rest of the girls included a cute hand knit brown sweater, a pair of pretty blue wool socks by Lisbeth Dahl and a set of tiny white and green rompers with a matching cap that said “tiny hippo”:-). The mother-to-be was of course thrilled with the baby shower and the gifts and a good time was had by all.

Wool baby socks

A pair of cute, blue baby socks in wool

Baby sweater

A hand-knit sweater to keep the cold out!